Tuesday, January 29, 2013

Sweet On You

SweetOnYou
©Barbara Butler
January 29, 2013


Supplies Needed:
Darker Passion ASB Can Be found Here
Template170 By Leah from Amy and Leah's Gimptastic Tuts Here 
Plugin Tramage Pool shadow 
Tube of choice.  I'm using Angel by VeryMany can be found at PFD.

Let's Begin:

Open template.  Duplicate close original.  And delete the copyright layer. 

Raster 11 Select all float de-float paste Paper05 invert hit delete.  deselect.

 Raster 4 select all float de-float paste Paper04 invert hit delete.  deselect.  Add plugin Tramage Pool shadow settings of choice.

Raster 5 select all float de-float paste Paper03 invert hit delete.  deselect. 
Add plugin Tramage Pool shadow settings of choice.

Raster 6 select all float de-float paste Paper01 invert hit delete.  deselect.  Repeat for Rasters  8, 10

Raster 3 select all float de-float paste Paper06 into selection. 

Paste the following elements onto to the tag.
E34 75% three times move to the left.
E30 75% three times move to the bottom right
E18 75% four times move behind E30
E15 75% five times move to the left right behind the wordart
E09 75% five times move behind E15

Tuesday, January 15, 2013

§Wonderland§


Wonderland
©Barbara Butler
Jan. 15, 2013


Scrap Kit:  Alice In Wonderland By Stef's Scraps
Template 137 by Leah @Amy and Leah's Gimptastic Tuts
Tube of choice.  I'm using the artwork of Melissa Dawn.  You can fine it over at CDO.  Please do not use without buying it and having a proper LIC#.
This tut was written from my own imagination.  Any similarities is purely coincidental.  This tut was written for people with working knowledge of psp.
Lets Begin

Open Template Duplicate and close the original.  Delete the copyright layer.

On Layer12 select all>float>de float paste Paper08 onto canvas invert and hit delete.  Select none.  Repeat for Layer11.

On Layer10 select all>float>de float paste Paper12 into selection.  Select none.

On Layer9 select all>float>de float paste Paper07 onto canvas invert and hit delete.

On Layer8 select all>float>de float paste Paper01 into selection.  Select none.

On Layer 7 select all>float>de float paste Paper04 into selection.  Select none.

On Layer6 select all>float>de float paste Paper06 onto canvas invert and hit delete.  Select none.

On Layer 5 select all>float>de float paste Paper08  inver and hit delete.  Select none.

On Layer 4 select all>float>de float paste Paper03 into selection.  Select none.

On  Layer 3 select all>float>de float paste Paper02 invert and hit delete.  Select none.

On Layer 2 select all>float>de float paste Paper11 into selection.  Select none.

On Layer 1 select all>float>de float paste Paper09 into selection.  Select none.


Paste Element01 re-size 75% three times.  Move to the right.

Paste Element02 re size 75% twice.  Move behind the chair.

Paste Element03 re size by 50% once, then by 75% twice.  Free rotate 45 degrees to the left.

Paste Element19 re size 75% five times.  Mirror and place on the left.

Paste Element18 re size 75% twice and place behind the key.

Paste Element05 re size 75% twice.  And place behind the heart.

Copy tube of choice.  Add copyright and save as a psp or psd.

Add name(s) resize if needed and save as png. 

Thank you for taking a look at my tut.

Monday, January 14, 2013

♣Irish Clover♣


Irish Clover
©Barbara Butler

January 14, 2013

Kit Used:
Irish Clover Lucky by Designs By Joan You can fine it Here
Tube of choice.  I am using one by Ismael Rac.  Please do not use without purchasing and have a license.
Mask WSL84
Plugin Eyecandy 4000 (completely optional).

Select all paste Paper 9 into Selection.  Select none.  Apply mask merge.

Paste Harp re-size 75% mirror place on the bottom right.

Paste ELEM42 move to the top.

Paste Elem3 re-size 75% twice.  move to the bottom left.

Paste Bow 2 re-size 75% twice move behind the corset to where it looks like it is a train on it.

Paste Elem 5 re-size 75% twice place behind the other two elements on the left.  Duplicate the layer mirror and move to the left.

Paste ELEM 7 re-size 75% twice and place in front of the harp.  Add a gradient glow at setting your choice.  I used a fat glow one with a neon green and a darkgreen and then repeated it with a white glow.

Paste Elem14 re-size 75% twice.  Placer right in front of the horseshoe on the right.

Paste Elem25 re-size 75% three times.  Free rotate 15 degrees to the right.  Place to the left of the rainbow.

Paste Elem4 re-size 75% twice.  Mirror and place to the right of the rainbow.

Paste Sparkles and place behind the bottom sets of elements.

Paste Bubbles re-size 75% twice place on top of the sparkles.

Add tube of choice along with the copyright.  Save as a psp or psd.

Add name and a gradient glow with settings of you choice.  Re-size and save as png.

Thank you for taking a look at my tut.

Saturday, January 12, 2013

Carnivale

Carnival
© Barbara Butler
January 12, 2013


Supplies Needed:
Template Val02_2013 can be found Here it is apart of my new valentines day templates.
Kit Carnival by BLT Designz can be found Here
Tube of choice.  I am using VeryMany and it can be found at PFD.  Please don't use this tube without the proper license and purchasing the tube.

Open temp duplicate and close original.  Delete copyright and wordart layers.

Paste Balcony re-size 75% twice place on the left side.

Paste Car re-size 75% three times place on the right side.

Paste Flower 1 re-size 75% three times place over copy of Raster6.

Paste Flower3 re-size 75% four times move to the left just in front of the balcony mirror.

Raster 4 select all>float>de float paste PP2 into selection.  Select none.

 Raster 13 select all>float>de float paste PP1 into selection.  Select none.

Raster 6 select all>float>de float paste PP5 invert hit delete.  Select none.  Repeat for Copy of Raster 6.  Select none.

Raster 3 select all>float>de float paste PP3 into selection.  Select none.

Raster 5 select all>float>de float paste PP4 onto canvas invert hit delete.  Select none.

Raster 2 select all>float>de float paste PP6 onto canvas invert and hit delete.  Select none.

Paste Sparkle re-size 75% three times move to the top left.

Paste Record Player re-size 75% twice.  Mirror, move to the bottom left and put behind the flower.

Paste Mask re-size 75% three times.  Free rotate 15 degrees to the right.  Place behind the record player

Paste leaves re-size 75%  three times mirror place behind the mask.

Paste Fastener and move behind all the other elements and move to the bottom.

Paste Branch re-size 75% move to the bottom and behind the fastener.

Add tube and copyright and save as a psp or psd.

Add name(s) re-size as needed.  And save as a png.

Thank you for taking a look at my tut.

Wednesday, January 9, 2013

WildHearts

Wild Hearts
©Barbara Butler
Jan. 9, 2013

 Scrap Kit: 
WillowLane By:  The Brown Owl@Tagging Angels Here
Mask: 
Mask of choice.
Tube of Choice:
I'm using PlumeriaFae By Joel Adams can be found at CDO
Plugin:
Mura Meister
 
New Canvas 800X600
See My tag for placement of all elements.

Paste GardenBench re-size 75% four times.  Place to the left.

Paste Flower Cluster re-size 75% five times.  Place in front of the Bench.

Paste Leaves2 re-size 75% five times.  Place in front of the other two elements.

Paste TallGrass re-size 75% three times.  Place behind the bench.

Paste Flowers re-size 75% five times free rotate 90 degrees to the left.  Duplicate move down to the left just a little then mirror.

Paste Flower2 re-size 75% five times.  Using mura meister copies on default settings just move the top slider to 2 or until you get the amount you like or until it looks like mine.

Select all add new layer paste Paper8 into selection.  Add another new layer and paste Paper1 apply your mask.  Make sure these are at the bottom in the layer palette.

Add tube and place just above the mask layer.  

Add copyright.  Save as either a psp or psd.  If you are using any other 
program make sure you save it to the format of the program just in case you might want to make changes to it.

Add name re-size and save as either png or jpg.  And you are done.
If you want you can add a little frame on the outside before you re-size your tag.  Then add your name and re-size and save.  This step is clearly up to you.

Thank you for taking a look at my tut.

Love At Midnight

Love at Midnight
©Barbara Butler


Supplies Needed:
Scrap Kit: Midnight Blue by Rabid Designz @Tagging Angels
Template:  Temp04_2013 by Me Here
Fonts:  Arial for the copyright.  Symphony in ABC for the name. 


Lets Begin:

Raster 8 select all>float> de float paste Paper3 onto canvas invert hit delete.  Select none.
Raster 6 select all>float>de float> paste Paper5 onto canvas invert and hit delete.  Select none.  Repeat with the Copy of Raster 6 Layer.
Raster 2 select all>float>de float>paste Paper8 onto canvas invert and hit delete.  Select none.  Repeat for the copy layer.
Raster 3 select all>float>de float>paste Paper6 onto canvas invert and hit delete.  Select none.  Repeat for Raster 4.
Raster 5 select all>float>de float>paste Paper7 onto canvas invert and hit delete.  Select none.
Raster 7 colorize with the manual color correction colorize it to a dark blue.

 You should now be at the top layer of the template.

Paste Element43 onto canvas.  Re-size 95% twice and move down just a little.
Paste Element45 onto canvas.  Re-size 75% free rotate 15 degrees to the right and move to the bottom right.
Paste Element18 onto canvas.  Re-size 75% twice and move to the bottom left.
Paste Element34 onto canvas.  Re-size 75% twice and place in front of the daggar.
Paste Element24 onto canvas.  Re-size 75% twice and place behind the daggar and flower.
Paste Element15 onto canvas.  Re-size 75% twice.  Free rotate 15 degrees to the left and place behind the candles.
Paste Element14 onto canvas.  Re-size 75% twice.  Free rotate 15 degrees to the left, and place on the top left.
Paste Element12 onto canvas.  Re-size 75% three times.  Free rotate 30 degrees to the right and place next to the heart behind the candles.
Paste Element11 onto canvas.  Re-size 75% three times.  Move between the heart and the clock.
Paste Element27 onto canvas and move to to the bottom of the music notes.

Paste Tube of choice onto the canvas.  Add copyright and save as either a psp or psd image.

Add name and any effects to it that you want.  Crop and re-size save as a png and you are done.


Simple Name Tag:
Make the candle, clock, heart, and flower the only elements you see visible.  Merge the four together and copy them as a new image.

Re-size the canvas to 800X600 and put on a name of your choice.  DO NOT CONVERT TO RASTER.  Save as a psp or psd.

Now convert the name to raster layer.  Crop and re-size as needed and save as a png.  And you are done.

Thank you for taking a look at my tut.

~♥~Moms Day~♥~

~♥~Moms Day~♥~


Supplies
Kit:  My Mother's Special Day By:  Disyas Digitals Designs.  Can be found at Country Corner Creations
Tube of choice.  I'm using the amazing artwork of Anna Liwanag.  I got this tube when PTE was still opened.  You can now fine this tube and many of her others over at CDO.  She also has some over PicsForDesign under the name Nocturne.  Please Do not use without a proper license and purchasing the tube.

XERO-Soft Mood 
Setting for Soft Mood

Copy and Paste the following elements and re size by 75% at least two times.  See my tag for placement.
6, 7, 16, 4 mirror this one, 96, 66, 49 make sure this one is behind the others., 22 mirror, merge these together and resize one more time place on the right side. 

For the frame draw an ellipse with the selection tool selections>modify>borders>inside 9 and paste C2 into selection.   Select none.  Paste E23 re size 75% a few time place on the left side of the frame and manual colorize to color of choosing.  Repeat this with E5.

With magic wand click on the inside of the frame layer add new layer and paste P12 into selection.  

Open the tube you plan on using while there mirror the CU copy and paste onto working canvas.  Resize just a little bit move to left invert and hit delete.  

 Add Xero-Soft Mood use the following settings and change blend mode to multiply.  Add Dropshadow of choice.

Back on your tube copy the main tube and paste it on your working canvas and place behind the elements on the right.  
Add copyright and save as a psp or psd.

Add name add any effects you want.  Crop and re-size as needed and save as a png.  

Thank you for taking a look at my tut.
 

Tuesday, January 8, 2013

♥Sweet Love♥

Sweet Love
©Barbara Butler
January 8, 2013


Materials Needed
Scrap Kit:  Sweet Love By MoodyDesignz @Mystical Scraps
Template: 160 by Leah @AmyandLeahsGimptasticTuts 
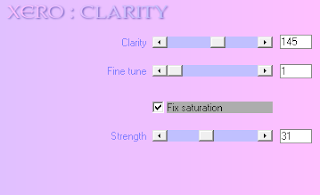
Xero Radience, Porcelain, Clarity  Settings for each are shown below.
Tube of Choice:  I used VeryMany's Angel can be Found @ PicsForDesign


Porcelain Settings


Elements and Papers Used:
AngelDevilHeart
Balloons1
Bees
Butterfly
Candle
DoodleCharm3
Letters
Papers:  1, 2, 4, 5, 6, 8, 13
Roses
TeddyBear


Let's Begin:

Open Template Duplicate it and delete the original.
Delete copyright and word art layers.  Re size canvas to 800X507.  Don't worry we'll be resizing later on.

Layer 6 select all>float>de float paste Paper(6) invert delete.  Select none. 
Layer 7 select all>float>de float paste Paper(4) invert delete.  Select none.
Layer 5 select all>float>de float paste Paper(5) invert delete. Open tube of choice mirror and paste it resize and move to where you can see just the face in the heart.  Select none.  Now add xero radience, porcelain, and clarity (settings to liking or what fits the tube you choose).  Change the blend mode to what fits your tube I used
Layer 3 select all>float>de float paste Paper(8) invert delete.  Select none.
Layer 2 select all>float>de float paste Paper(13) into selection.  Select none.
Layer 1 select all>float>de float paste Paper(2) invert delete.  Select none.
Layer 4 select all>float>de float paste Paper(1) invert delete.  Select none.


Paste the Butterfly re size 75% 5 times and place free rotate 15 degrees to the right.
Paste Candle re size by 75% 4 times bring to top and place at the bottom left.
Paste Balloons1 re size 75% 3 times move behind the candle.
Paste AngelDevilHeart re size 75% 3 times and again by 85% once.
Paste DoodleCharm re size 75% 4 times put behind AngelDevilHeart.
Paste Letter re size 75% 5 times move behind the candle layer and to the left just a little bit, so some of the bow shows.
Paste Roses re size 4 times move below the AngelDevil Hearts.
Paste Bee re size 4 times see mine for placement.
Paste TeddyBear re size 75% 3 times move to the left a little bit just a little behind the candle (see mine for exact placement).

Hide all layers except for the ones on the right side of the tag (hide the butterfly though) Merge Visible..  Hide the merged layer and unhide all the elements on the left side and merge visible again.  Re-size (to liking) both merged layers. Unhide all the other layers.

Add tube and copyright save as a psp or psd.  Cropy tag down a little. 

Add name, re size save as a png and you are done.

Thank you for taking a look at my tut.

Monday, January 7, 2013

♥CountryGirl♥


Country Girls
©Barbara Butler
Jan. 7, 2013

Materials:
Temp03_2013 By Me Here
ScrapKit:  Country Girl Store Tagging Angels
By Scrappin Krazy Designs
   http: //scrappinkrazydesigns.blogspot.com
Tube:
Pretty Cowgirl by Ismael Rac
You can fine the template through the link and everything else is on the side.

Remember to save often:
Let's Begin:
Open template SHift+D and delete the original.  Delete copyright layer.
On Raster5 select all>float>de float new raster layer and copy P08 into selection and change the blend mode to overlay.

With magic wand click on teh yellow part of Raster3  expand by 2 and paste P11 onto canvas invert and hit delete.   Repeat with Copy of Raster3.
 
On Raster2 select all>float>de float> contract by 5 and paste P12 onto canvas invert and delete.  Repeat this with the first copy of Raster2 but paste P18 onto canvas invert and delete.  Repeat one more time for the second copy of the Raster and paste P03 invert and delete.

On Raster4 select all>float>de float contract by 5 and paste P04 into selection select none.

For the next part you might want to adjust your canvas so you properly place the elements.  You can crop it to size at the end.  I put mine at 1200X909 but it is up to you.

Paste Ele11 re-size by 75% twice and place on the left right behind the wordart.  Paste Ele06 re-size 75% twice and place on the right side.

Paste Ele13 and move to the bottom leave it behind the wordart.  Paste Ele09 re-size by 75% twice place to the left just in front of the horse. 

Paste Ele81 move to the bottom and in the layer palette place the left side just behind the hat. 
Paste Ele38 re-size75% twice free rotate to the left by 15 degrees.  Place on the right side of the hearts.

Paste the following elements and place to your liking (or see mine for placement).
Ele26
Ele27
Ele28
Ele29

You might want to crop and resize before adding your tube.  I got mine down to 728X535.

On Raster13 Paste Tube of choice mirror back on the bottom layer select all>float>de float> invert and on the tube layer hit delete.  select none.  Change blend mode Luminance(L)   Crop image.  add a DS of choice.  You want to crop before adding the drop shadow or you'll see it at the bottom of the tag.

Copy main tube re-size 75% 5 times and place to the right of the circles. 

Add copyright.  Save as a psp or psd.

Add name(s) re size and save as a png.  And you are done.  Thank you for taking a look.